Overview
Windows එකේ built-in "Incoming Connection" feature එකක් තියෙනවා — ඒකෙන් ඔබේ PC එක simple VPN server එකක් කරලා, ඕනෑම තැනක ඉඳලා ඔබේ home network එකට ආපහු connect වෙන්න දෙනවා. මේ guide එකෙන් network prerequisites ඇතුළුව ඒක set කරන ආකාරය පෙන්නනවා.
Windows එකට simple incoming VPN server එකක් විදිහට act කරන්න පුළුවන්.
Warning: VPN server එකක් internet එකට expose කරන එකට security implications තියෙනවා. Strong account passwords පාවිච්චි කරලා, Windows updated තියාගෙන, sensitive දෙයකට dedicated VPN solution එකක් සලකා බලන්න.
Key Takeaways
- Windows' Incoming Connection feature එකෙන් basic VPN server එකක් හදනවා.
- Static local IP එකක්, port forwarding, සහ ideally DDNS ඕන.
- Firewall එකෙන් VPN එක allow කරලා users ලාට dial-in access grant කරන්න.
- Robust security වලට, dedicated VPN (WireGuard/OpenVPN) එකක් preferable.
Step 1 — Static Local IP එකක් Set කරන්න
1. Network Connections (ncpa.cpl) සහ ඔබේ adapter එකේ Properties open කරන්න.
2. IPv4 edit කරලා ඔබේ router's range එක ඇතුළේ static IP, subnet, gateway, සහ DNS set කරන්න.
3. මේකෙන් port forwarding වලට server එකේ address එක consistent තියාගන්නවා.
Step 2 — ඔබේ Public IP එක Note කරලා DDNS Set කරන්න
1. ඔබේ public IP එක හොයන්න ("what is my IP" search කරන්න).
2. ඔබේ public IP එක වෙනස් වෙනවා නම්, hostname එකක් හැමවෙලේම ඔබ දිහාට point වෙන්න router එකේ Dynamic DNS (DDNS) set කරන්න.
3. Connect වෙනකොට DDNS hostname එක පාවිච්චි කරන්න.
Step 3 — Port Forwarding Configure කරන්න
1. ඔබේ router එකට log in වෙන්න.
2. VPN port එක (PPTP TCP 1723 පාවිච්චි කරනවා) ඔබේ PC එකේ static IP එකට forward කරන්න.
3. Save කරලා required නම් router එක reboot කරන්න.
Step 4 — Windows එකේ VPN Server එක හදන්න
1. Network Connections (ncpa.cpl) open කරන්න.
2. Menu එක පෙන්නන්න Alt press කරලා, File > New Incoming Connection.
3. Connect වෙන්න allowed user accounts select කරන්න (හෝ dedicated user එකක් add කරන්න).
4. "Through the Internet" tick කරලා, TCP/IPv4 configure කරලා (optionally client IP range එකක් assign කරලා), Allow access click කරන්න.
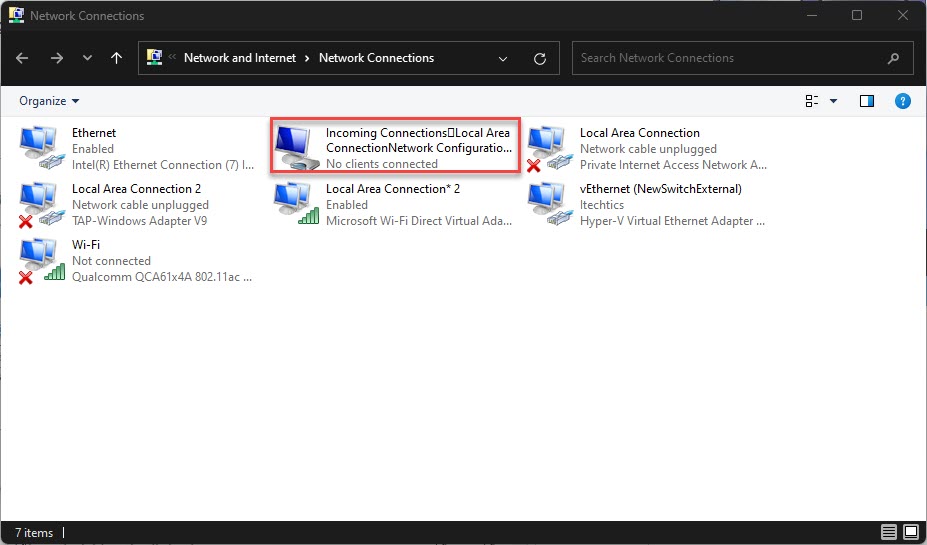
Windows එකේ අලුත් incoming VPN adapter එකක් හැදුවා.
Step 5 — Firewall එකෙන් Allow කරලා Connect කරන්න
1. Windows Firewall එක incoming VPN එක allow කරනවා කියලා බලන්න (Routing and Remote Access).
2. Client device එකේ, ඔබේ public IP/DDNS hostname එකට point වෙන VPN connection එකක් add කරන්න.
3. Allowed account එකෙන් sign in වෙලා connect වෙන්න.
Troubleshooting
Problem: එළියෙන් connect වෙන්න බෑ.
Solution: හරි static IP එකට port forwarding, ඔබේ public IP/DDNS හරි, ISP එක port එක block නොකරනවා හෝ CGNAT පාවිච්චි නොකරනවා කියලා verify කරන්න.
Problem: Connect වෙනවා ඒත් network access නෑ.
Solution: Assigned client IP range එකයි "Allow callers to access my local network" enabled ද කියලා බලන්න.
Problem: PPTP block වෙනවා.
Solution: සමහර networks PPTP block කරනවා; third-party software හරහා WireGuard/OpenVPN වගේ වඩා secure, modern VPN එකක් සලකා බලන්න.
Problem: CGNAT පිටිපස්සේ.
Solution: Port forwarding වැඩ කරන්නේ නෑ; VPN service එකක්, cloud relay එකක්, පාවිච්චි කරන්න හෝ ISP එකෙන් public IP එකක් ඉල්ලන්න.
Conclusion
Static IP එකක්, port forwarding, සහ DDNS set කරාම Incoming Connection feature එකෙන් Windows එකට basic VPN එකක් host කරන්න පුළුවන්. Stronger security එකකට සහ ලේසි setup එකකට, WireGuard හෝ OpenVPN වගේ dedicated VPN solution එකක් සලකා බලන්න.
About TechHub
මේ guide එක TechHub Knowledge Base එකේ කොටසක්. තව step-by-step IT guides සහ support වලට techhub.com.lk එකට යන්න.