Overview
Windows 11 has a built-in VPN client, so you can connect to a workplace VPN or a VPN service without extra software. This guide shows how to add a VPN profile, connect, and manage it.
Windows 11 includes a built-in VPN client.
Key Takeaways
- You need the VPN server address, protocol type, and sign-in details.
- Add a VPN profile in Settings > Network & Internet > VPN.
- Connect from Quick Settings or the VPN page.
- Some VPNs need an imported certificate.
Prerequisites
- A VPN server/service and your account credentials.
- The VPN type/protocol (e.g. IKEv2, L2TP/IPsec, SSTP, PPTP, or "Automatic").
- Any pre-shared key or certificate the server requires.
Step 1 — Create a VPN Profile
1. Open Settings > Network & Internet > VPN > Add VPN.
2. Set VPN provider to "Windows (built-in)".
3. Enter a Connection name, the Server name or address, the VPN type, and the sign-in info type.
4. Add your username/password (or certificate), then Save.
Step 2 — Adjust Network Properties (If Needed)
1. Open Network Connections (ncpa.cpl), right-click the VPN adapter, and choose Properties.
2. On the Security tab, set the correct protocol and authentication (and pre-shared key for L2TP).
3. On the Networking tab, configure IPv4 settings if your admin specifies.
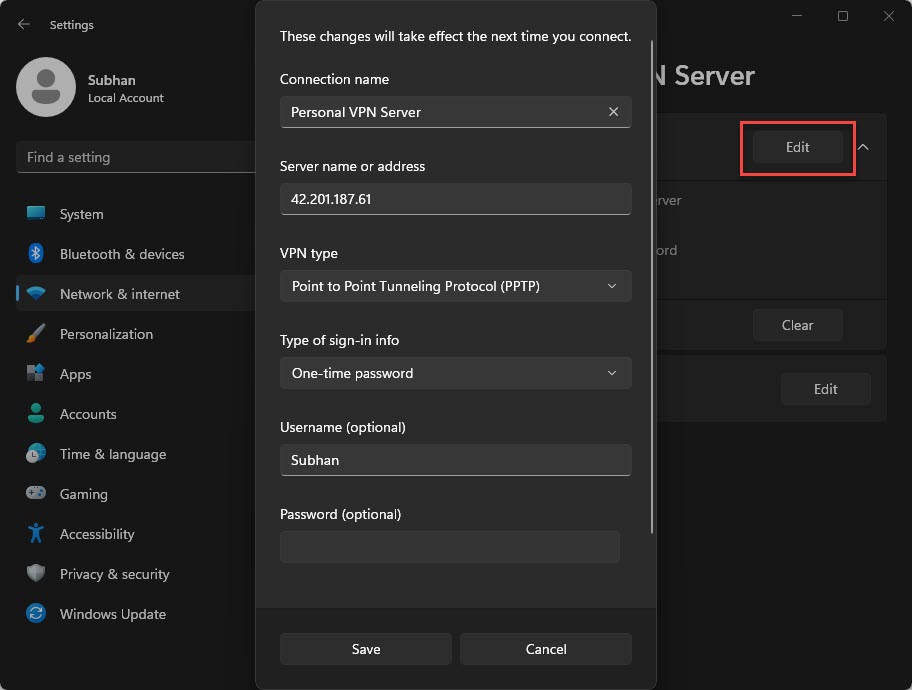
Edit an existing VPN profile’s properties.
Step 3 — Connect
1. Click the network icon in the taskbar (or Settings > VPN).
2. Select your VPN and click Connect.
3. Enter credentials if prompted; the status shows Connected.
Import a Certificate / Remove a Profile
- Certificate — double-click the .cer/.pfx file and import it into the correct store (Personal or Trusted Root) as your admin specifies.
- Remove — Settings > Network & Internet > VPN, select the profile, and click Remove.
Troubleshooting
Problem: Connection fails to authenticate.
Solution: Verify the username/password, the VPN type, and any pre-shared key/certificate; confirm details with your VPN provider/admin.
Problem: Connects but no internet.
Solution: Toggle "Use default gateway on remote network" in the VPN adapter’s IPv4 advanced settings as appropriate for your setup.
Problem: L2TP fails behind NAT.
Solution: Ensure the pre-shared key is correct and that NAT-T is supported; some routers need IPsec passthrough enabled.
Problem: The VPN type is unknown.
Solution: Set the type to Automatic, or ask your provider; many services also offer their own app instead of manual setup.
Conclusion
Adding a VPN in Windows 11 takes a minute: create the profile with your server address and protocol, set credentials, and connect. Import a certificate if required, and use your provider’s details to get the settings right.
</w:pBdr><w:spacing w:before="220" w:after="40"/></w:pPr><w:r><w:rPr><w:b/><w:bCs/><w:color w:val="0B5394"/><w:sz w:val="21"/><w:szCs w:val="21"/><w:rFonts w:ascii="Calibri" w:cs="Calibri" w:eastAsia="Calibri" w:hAnsi="Calibri"/></w:rPr><w:t xml:space="preserve">About TechHub
This guide is part of the TechHub Knowledge Base. For more step-by-step IT guides and support, visit techhub.com.lk.