Overview
Windows 11 එකේ built-in VPN client එකක් තියෙනවා, ඒ නිසා extra software නැතුව workplace VPN එකකට හෝ VPN service එකකට connect වෙන්න පුළුවන්. මේ guide එකෙන් VPN profile එකක් add කරලා, connect කරලා, manage කරන ආකාරය පෙන්නනවා.
Windows 11 එකේ built-in VPN client එකක් තියෙනවා.
Key Takeaways
- VPN server address එක, protocol type එක, සහ sign-in details ඕන.
- Settings > Network & Internet > VPN එකේ VPN profile එකක් add කරන්න.
- Quick Settings හෝ VPN page එකෙන් connect කරන්න.
- සමහර VPNs වලට imported certificate එකක් ඕන.
Prerequisites
- VPN server/service එකක් සහ ඔබේ account credentials.
- VPN type/protocol එක (බ. IKEv2, L2TP/IPsec, SSTP, PPTP, හෝ "Automatic").
- Server එකට ඕන ඕනෑම pre-shared key එකක් හෝ certificate එකක්.
Step 1 — VPN Profile එකක් Create කරන්න
1. Settings > Network & Internet > VPN > Add VPN open කරන්න.
2. VPN provider එක "Windows (built-in)" කරන්න.
3. Connection name එකක්, Server name/address එකක්, VPN type එක, සහ sign-in info type එක ඇතුළත් කරන්න.
4. ඔබේ username/password (හෝ certificate) add කරලා Save කරන්න.
Step 2 — Network Properties Adjust කරන්න (ඕන නම්)
1. Network Connections (ncpa.cpl) open කරලා, VPN adapter එක right-click කරලා Properties තෝරන්න.
2. Security tab එකේ, හරි protocol එකයි authentication එකයි set කරන්න (L2TP වලට pre-shared key එකයි).
3. Networking tab එකේ, admin specify කරනවා නම් IPv4 settings configure කරන්න.
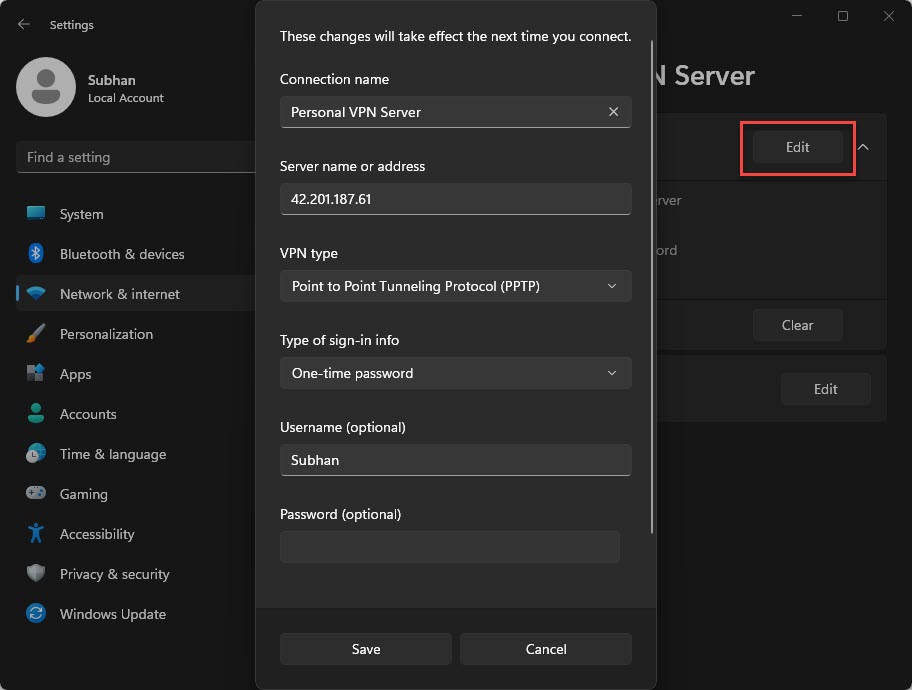
Existing VPN profile එකක properties edit කරන්න.
Step 3 — Connect කරන්න
1. Taskbar එකේ network icon එක click කරන්න (හෝ Settings > VPN).
2. ඔබේ VPN එක select කරලා Connect click කරන්න.
3. Prompt වුණොත් credentials ඇතුළත් කරන්න; status එකේ Connected පෙන්නනවා.
Certificate එකක් Import කරන්න / Profile එකක් Remove කරන්න
- Certificate — .cer/.pfx file එක double-click කරලා admin specify කරන correct store එකට (Personal හෝ Trusted Root) import කරන්න.
- Remove — Settings > Network & Internet > VPN, profile එක select කරලා Remove click කරන්න.
Troubleshooting
Problem: Connection එක authenticate වෙන්නේ නෑ.
Solution: Username/password එක, VPN type එක, සහ ඕනෑම pre-shared key/certificate එකක් verify කරන්න; VPN provider/admin එක්ක details confirm කරන්න.
Problem: Connect වෙනවා ඒත් internet නෑ.
Solution: VPN adapter එකේ IPv4 advanced settings වල "Use default gateway on remote network" ඔබේ setup එකට appropriate විදිහට toggle කරන්න.
Problem: NAT පිටිපස්සේ L2TP fail වෙනවා.
Solution: Pre-shared key එක හරි, NAT-T supported කියලා බලන්න; සමහර routers වලට IPsec passthrough enable කරන්න ඕන.
Problem: VPN type එක unknown.
Solution: Type එක Automatic කරන්න, නැත්නම් provider එකෙන් අහන්න; ගොඩක් services manual setup වෙනුවට ඒගොල්ලන්ගේම app එකකුත් දෙනවා.
Conclusion
Windows 11 එකේ VPN එකක් add කරන්න යන්නේ මිනිත්තුවක්: server address එකයි protocol එකයි එක්ක profile එක හදලා, credentials set කරලා, connect කරන්න. Required නම් certificate එකක් import කරලා, settings හරියට ගන්න provider එකේ details පාවිච්චි කරන්න.
About TechHub
මේ guide එක TechHub Knowledge Base එකේ කොටසක්. තව step-by-step IT guides සහ support වලට techhub.com.lk එකට යන්න.