Overview
Slipstreaming කියන්නේ updates කෙලින්ම Windows installation image එකට integrate කරන එකයි — ඒ නිසා fresh install එකක් කරද්දී එය already patched වෙලා එනවා. මේකෙන් වෙලාව ඉතුරු වෙනවා, install කරලා ඊට පස්සේ දිගු updates round එකක් කරන එක වළක්වනවා, machines ගොඩකට Windows deploy කරද්දී මේක ඉතාම වටිනවා. මේ guide එකෙන් built-in DISM tool එක පාවිච්චි කරලා cumulative update packages Windows 10 ISO එකකට inject කරන්නේ කොහොමද කියලා පැහැදිලි කරනවා.
Key Takeaways
- Slipstreaming එකෙන් updates install.wim එකට bake කරනවා, ඒ නිසා අලුත් installs already up to date වෙනවා.
- Updates official Microsoft Update Catalog එකෙන් .msu files විදිහට download කරනවා.
- DISM image එක mount කරලා, packages add කරලා, ඊට පස්සේ changes commit කරනවා.
- Slipstreaming ඉවර උනාම update කරපු files වලින් ISO එක ආයෙත් rebuild කරනවා.
Note: Update packages genuine බව තහවුරු කරගන්න catalog.update.microsoft.com එකේ තියෙන official Microsoft Update Catalog එකෙන් විතරක් download කරන්න.
Prepare the Files
1. ඔබේ Windows 10 ISO එකේ contents drive එකේ working folder එකකට extract කරන්න.
2. Mount කරපු image එක තියාගන්න වෙනම folder එකකුයි, update files වලට තව එකකුයි හදන්න.
3. ඔබේ Windows 10 build එකට අදාළ cumulative update .msu files Microsoft Update Catalog එකෙන් download කරන්න.
Mount and Update the Image
1. Extract කරපු files තියෙන folder එකේ elevated Command Prompt එකක් open කරන්න.
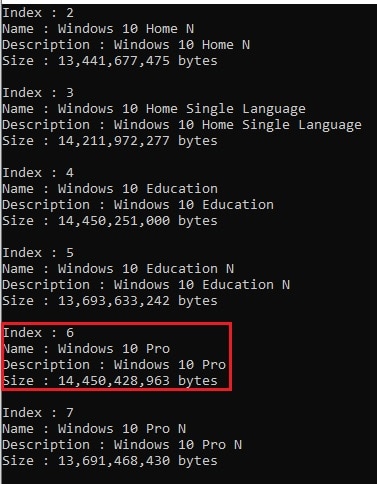
2. නිවැරදි image index එක හොයාගන්න DISM /Get-WimInfo /WimFile:sources\install.wim run කරන්න.
3. Image එක mount කරන්න: DISM /Mount-Wim /WimFile:sources\install.wim /Index:<number> /MountDir:mount
4. හැම update එකක්ම add කරන්න: DISM /Image:mount /Add-Package /PackagePath:"C:\updates\update.msu"
5. හැම package එකක්ම success කියලා report කරනකම් ඉන්න.
Mount කරන්න කලින් නිවැරදි image index එක හොයාගැනීම.
Commit and Rebuild
1. Changes commit කරලා unmount කරන්න: DISM /Unmount-Wim /MountDir:mount /Commit
2. Update කරපු folder එක bootable ISO එකකට repackage කරන්න Windows ADK oscdimg utility එක වගේ ISO-authoring tool එකක් පාවිච්චි කරන්න.
3. හැම තැනම deploy කරන්න කලින් අලුත් ISO එක virtual machine එකක test කරන්න.
Warning: හැමවෙලේම ඔබේ install files වල copy එකක් උඩ වැඩ කරන්න. DISM operation එක අතරමගදී interrupt උනොත් image එක inconsistent state එකක ඉතුරු වෙන්න පුළුවන්, ඒ නිසා ඔබේ එකම copy එක කවදාවත් modify කරන්න එපා.
Troubleshooting
Problem: DISM කියනවා package එක image එකට applicable නෑ කියලා.
Solution: Update එක ඔබ mount කරපු image එකේ හරියටම Windows 10 version එකට සහ architecture එකට match වෙනවද කියලා තහවුරු කරගන්න.
Problem: Mount operation එක fail වෙනවා නැත්නම් hang වෙනවා.
Solution: DISM /Cleanup-Mountpoints run කරලා, mount folder එක හිස් බව තහවුරු කරලා, elevated prompt එකකින් ආයෙත් mount කරන්න.
Problem: Rebuild කරපු ISO එක boot වෙන්නේ නෑ.
Solution: Generic zip-to-ISO tool එකකට වඩා නිවැරදි boot sector parameters එක්ක oscdimg පාවිච්චි කරලා ISO එක ආයෙත් හදන්න.
Problem: ඔබ වැරදි image index එකක් තෝරගත්තා.
Solution: DISM /Get-WimInfo ආයෙත් run කරලා editions list කරලා, install කරන්න බලාපොරොත්තු වෙන edition එකට match වෙන index එක mount කරන්න.
Conclusion
Windows 10 ISO එකකට updates slipstream කරන එකෙන් පළවෙනි boot එකේ ඉඳලම patched වෙච්ච install media එකක් හැදෙනවා. DISM workflow එකට ඔබ පුරුදු උනාම, up-to-date deployment image එකක් maintain කරන එක සාමාන්ය කාර්යයක් වෙනවා.
About TechHub
මේ guide එක TechHub Knowledge Base එකේ කොටසක්. තව step-by-step IT guides සහ support වලට techhub.com.lk එකට යන්න.