Overview
Sync Settings නිසා Windows එකට ඔබේ personal configuration — themes, saved passwords, language preferences, සහ වෙනත් options — එකම Microsoft account එකෙන් sign in වෙන හැම PC එකකටම carry කරන්න පුළුවන්. මේක වැඩ කරද්දී, අලුත් machine එකකට යාම instant සහ හුරුපුරුදු වගේ දැනෙනවා. මේක නවතුනාම ඔබේ settings එක device එකකට විතරක් stuck වෙලා පෙනෙනවා. මේ guide එකෙන් sync on හෝ off කරන හැටියි, එය වැඩ කරන්න බැරි වුනාම repair කරන හැටියි පෙන්නනවා.
Key Takeaways
- Sync Settings වලට Microsoft account එකක් ඕන; local accounts වලට sync කරන්න බෑ.
- Sync එක control කරන්නේ Settings > Accounts > Sync your settings (Windows 10) හෝ Windows backup (Windows 11) වලින්.
- Group Policy හෝ Registry එකෙන් managed machines හරහා sync එක force කරලා on හෝ off කරන්න පුළුවන්.
- Sync failures ගොඩක් back-trace වෙන්නේ account verification, corrupted system files, හෝ policy override එකකට.
Enable Sync Settings
1. Windows + I press කරලා Settings open කරන්න.
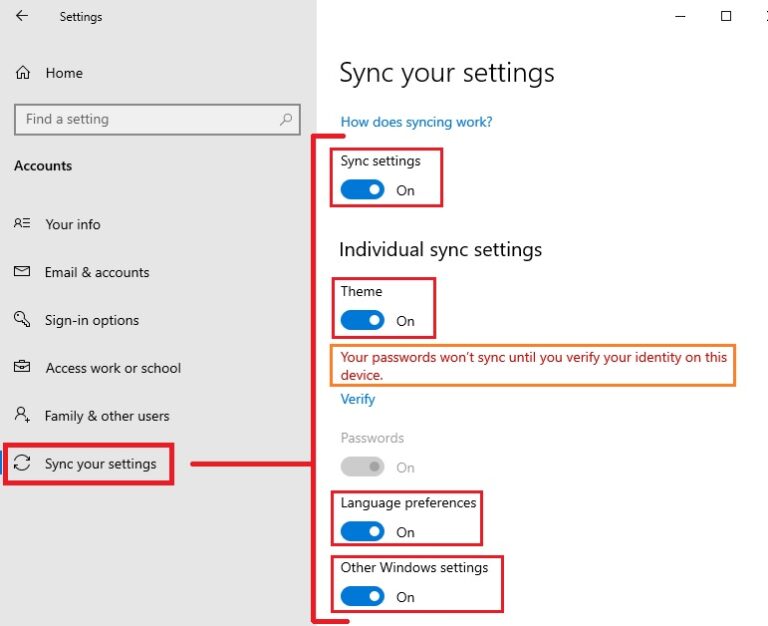
2. Accounts වලට ගිහින්, Sync your settings තෝරන්න (Windows 11 වල, Accounts > Windows backup > Remember my preferences open කරන්න).
3. Main Sync settings switch එක On කරන්න.
4. ඔබට sync කරන්න ඕන individual categories — Theme, Passwords, සහ Language preferences වගේ — on කරන්න.
5. ඔබේ අනිත් devices වල එකම Microsoft account එකෙන් sign in කරලා settings පෙනෙනවද බලන්න.
Accounts යටතේ ඇති Sync your settings page එක.
Disable Sync Settings
1. Settings > Accounts > Sync your settings open කරන්න.
2. සියලුම syncing එකවර නවත්තන්න master Sync settings toggle එක Off කරන්න.
3. නැත්නම්, master toggle එක on තියාගෙන, ඔබට share කරන්න ඕන නැති categories විතරක් disable කරන්න.
4. ඔබට syncing off කරන්න ඕන හැම device එකකම මේක repeat කරන්න.
Tip: ඔබ computer එකක් share කරනවා නම්, password sync disable කරලා තිබ්බම ඔබේ saved credentials shared device එකකට යාම වළක්වනවා.
Force Sync On or Off with Group Policy
1. Windows + R press කරලා, gpedit.msc type කරලා, Enter press කරන්න.
2. Computer Configuration > Administrative Templates > Windows Components > Sync your settings වලට navigate කරන්න.
3. Do not sync double-click කරලා, sync block කරන්න Enabled හෝ ඉඩ දෙන්න Disabled/Not Configured තෝරන්න.
4. OK click කරලා policy එක apply වෙන්න PC එක restart කරන්න.
Note: Group Policy Editor එක Pro, Enterprise, සහ Education editions වල තියෙනවා. Home editions වල, පහත Registry method එක use කරන්න.
Force Sync with the Registry
1. Windows + R press කරලා, regedit type කරලා, Enter press කරන්න.
2. HKEY_LOCAL_MACHINE\SOFTWARE\Policies\Microsoft\Windows\SettingSync වලට යන්න.
3. DisableSettingSync කියලා DWORD එකක් create කරලා, sync disable කරන්න 2 විදිහටත්, ඉඩ දෙන්න 1 විදිහටත් set කරන්න.
4. Editor එක close කරලා computer එක restart කරන්න.
Warning: Registry එක වැරදියට edit කරොත් system problems ඇති වෙන්න පුළුවන්. වෙනස්කම් කරන්න කලින් registry එක back up කරන්න (File > Export).
Troubleshooting
Problem: Sync settings toggle එක greyed out.
Solution: ඔබ local account එකක් වෙනුවට Microsoft account එකකින් sign in වෙලා ඉන්නවද කියලා confirm කරන්න, සහ Group Policy හෝ registry value එකක් sync block කරන්නේ නැහැ කියලා බලන්න.
Problem: Devices හරහා settings sync වෙන්නේ නෑ.
Solution: Settings > Accounts > Your info හරහා හැම device එකකම ඔබේ identity verify කරලා, Microsoft account troubleshooter එක run කරන්න.
Problem: Windows update එකකට පස්සේ sync නැවතුනා.
Solution: Corrupted system files repair කරන්න elevated Command Prompt එකකින් sfc /scannow run කරලා, restart කරන්න.
Problem: Categories වලින් ටිකක් විතරයි sync වෙන්නේ.
Solution: Sync your settings open කරලා master switch එක විතරක් නෙවෙයි, individual category toggle එකක්ම on කරලා තියෙනවද කියලා බලන්න.
Conclusion
Sync Settings කියන්නේ ඔබ sign in වෙන හැම තැනකම ඔබේ Windows experience එක consistent තියාගන්නා නිශ්ශබ්ද පහසුවක්. Seamless multi-device setup එකකට enable කරන්න, shared machines වල privacy වලට disable කරන්න, සහ ඕන වෙද්දී එයට තල්ලුවක් දෙන්න ඉහත Group Policy, Registry, සහ repair steps use කරන්න.
About TechHub
මේ guide එක TechHub Knowledge Base එකේ කොටසක්. තව step-by-step IT guides සහ support වලට techhub.com.lk එකට යන්න.