Overview
Microsoft Microsoft Store versions වලට මාරු වුණාම classic built-in games අයින් කළා — ඒ Store versions වල බොහෝවිට ads තියෙනවා, sign-in එකකුත් ඕන. Free, community-maintained package එකකින් original Windows 7 games — Solitaire, Spider Solitaire, FreeCell, Hearts, Minesweeper, Mahjong Titans, Chess Titans, සහ Purble Place — restore කරලා Windows 11, 10, හෝ 8 වල cleanly install කරනවා. මේ guide එකෙන් ඒ ආකාරය පෙන්නනවා.
Classic Windows 7 games Windows 11 එකේ free restore කරන්න පුළුවන්.
Key Takeaways
- Free Windows 7 Games package එකකින් original classic games Windows 11/10/8 වල install කරනවා.
- Setup එකේදී කොයි games install කරනවද කියලා හරියටම තෝරන්න පුළුවන්.
- Games වෙන ඕනෑම app එකක් වගේ Start menu එකෙන් run වෙනවා, ads නෑ.
- PCs කිහිපයකට deploy කරන්න silent install option එකක් තියෙනවා.
පටන්ගන්න කලින්
- Windows 11, 10, හෝ 8 (package එක තුනම support කරනවා).
- .zip file එකක් extract කරන්න tool එකක් (Windows එකේ built-in).
- Games install කරන්න administrator rights.
Windows 7 Games Download කරලා Install කරන්නේ කොහොමද
1. Windows 7 Games package download page එක open කරලා Download Games button එක click කරන්න.
2. ZIP file එක download ඉවර වුණාම, ඒකේ contents හිස් folder එකකට extract කරන්න.
3. Extract කරපු folder එක open කරලා installer (.exe) file එක double-click කරලා run කරන්න.
4. මුල් screen එකේ, drop-down එකෙන් wizard language එක තෝරලා OK click කරන්න.
5. ඉදිරියට යන්න Next click කරන්න.
6. Install කරන්න ඕන games තෝරලා Install click කරන්න.
7. Installation ඉවර වුණාම, wizard එක close කරන්න Finish click කරන්න.
Tip: ඇත්තටම ඕන games විතරයි tick කරන්න — පස්සේ titles add/remove කරන්න installer එක ආපහු run කරන්න පුළුවන්.
Silent (Unattended) Installation
Prompts නැතුව games ඔක්කොම install කරන්න — PCs කිහිපයක් setup කරනකොට useful — silent switch එකක් එක්ක installer එක run කරන්න:
1. Installer එක තියෙන folder එකේ Command Prompt open කරන්න.
2. Installer එකට පස්සේ /S switch එක එක්ක run කරන්න (උදාහරණයක්: installer.exe /S).
3. Games ඔක්කොම wizard එකක් නැතුව automatically install වෙනවා.
Games Run කරන්නේ කොහොමද
1. Start button එක click කරලා All apps list එක open කරන්න.
2. Games folder එක හෝ individual game එක (උදාහරණයක් Solitaire හෝ Minesweeper) හොයන්න.
3. Game එක click කරලා launch කරන්න — ඒ original Windows 7 version එක වගේම run වෙනවා.
Games Uninstall කරන්නේ කොහොමද
1. Settings > Apps > Installed apps (හෝ Control Panel > Programs and Features) open කරන්න.
2. Windows 7 Games entry එක හොයන්න.
3. Click කරලා Uninstall තෝරලා, games ඔක්කොම remove කරන්න prompts follow කරන්න.
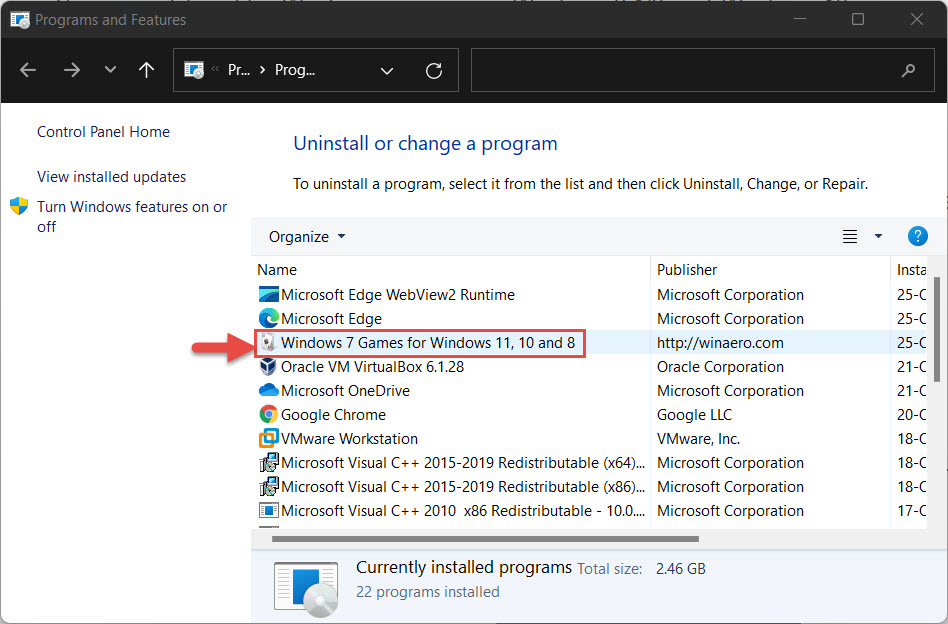
Installed apps එකෙන් classic games ඔක්කොම එකපාර remove කරන්න.
Note: ඔබේ game statistics සහ saved progress reinstalls අතර preserve වෙන්න පුළුවන්, මොකද ඒවා store වෙන්නේ ඔබේ user profile එකේ.
ඇයි Classic Games තෝරගන්නේ?
- Microsoft Store versions ගොඩක් වගේ නෙවෙයි — advertisements හෝ pop-ups නෑ.
- Play කරන්න Microsoft account sign-in එකක් ඕන නෑ.
- Lightweight සහ හුරුපුරුදු — original Windows 7 experience එකට සමානයි.
- Install වුණාම fully offline.
Frequently Asked Questions
Problem: Windows 7 games Windows 11 එකේ වැඩ කරනවද?
Solution: ඔව්. Community package එක Windows 11, 10, සහ 8 වලට design කරලා, games compatibility tweaks නැතුව natively run වෙනවා.
Problem: Install කළාට පස්සේ game එකක් launch වෙන්නේ නෑ.
Solution: Installer එක ආපහු run කරලා game එක selected කියලා confirm කරන්න, නැත්නම් package එක reinstall කරන්න. Administrator rights එක්ක install කළා කියලා බලන්න.
Problem: Package එක safe සහ free ද?
Solution: ඒක free. හැමවෙලේම well-known maintainer එකේ official page එකෙන් download කරලා, විශ්වාස නැත්නම් file එක scan කරන්න — මොකද ඒ third-party package එකක්.
Problem: Solitaire වගේ එක game එකක් විතරයි install කරන්න පුළුවන්ද?
Solution: ඔව්. Setup එකේදී ඕන game එක හැර අනිත් ඔක්කොම deselect කරලා Install click කරන්න.
Conclusion
Original Solitaire හෝ Minesweeper මතක් වෙනවා නම්, free Windows 7 Games package එකෙන් ඒවා minutes කිහිපයකින් Windows 11 එකට ආපහු ගේනවා — ad-free, sign-in-free, හරියට මතක විදිහටම.
About TechHub
මේ guide එක TechHub Knowledge Base එකේ කොටසක්. තව step-by-step IT guides සහ support වලට techhub.com.lk එකට යන්න.