Overview
Dell SupportAssist එකෙන් Dell PCs updated තියාගන්න උදව් වෙනවා, ඒත් ඒක misbehave වෙන්න හෝ reinstall වෙන්න refuse කරන්න පුළුවන්. Clean uninstall එකකින් app එකයි ඒකේ leftover services සහ files එකයි remove කරනවා. මේ guide එකෙන් ඒ ආකාරය පෙන්නනවා.
Clean uninstall එකකින් Dell SupportAssist එකේ traces ඔක්කොම remove කරනවා.
Key Takeaways
- මුලින් app එක uninstall කරලා, ඊට පස්සේ leftover Dell services සහ folders remove කරන්න.
- Reinstalls බොහෝවිට fail වෙන්නේ leftover services/files නිසා.
- Commands administrator විදිහට run කරන්න.
- Fully clean result එකකට steps අතර reboot කරන්න.
කවදද Clean Uninstall කරන්නේ
- SupportAssist crash වෙනවා හෝ open වෙන්නේ නෑ.
- Updates හෝ scans නැවත නැවත fail වෙනවා.
- Leftover components නිසා reinstall එකක් fail වෙනවා.
Step 1 — App එක Uninstall කරන්න
1. Settings > Apps > Installed apps open කරන්න.
2. Dell SupportAssist (සහ තියෙනවා නම් Dell SupportAssist Remediation/OS Recovery) හොයන්න.
3. එක එක එකට Uninstall click කරලා prompts follow කරන්න.
4. PC එක restart කරන්න.
Step 2 — Leftover Dell Services Remove කරන්න
1. Windows key + R press කරලා services.msc type කරලා Enter කරන්න.
2. ඉතුරු SupportAssist/Dell services හොයන්න.
3. ඒවායේ service names note කරලා, Command Prompt එක administrator විදිහට open කරන්න.
4. එක එක එක delete කරන්න: sc delete "ServiceName" (exact service name එක පාවිච්චි කරන්න).
5. PC එක restart කරන්න.
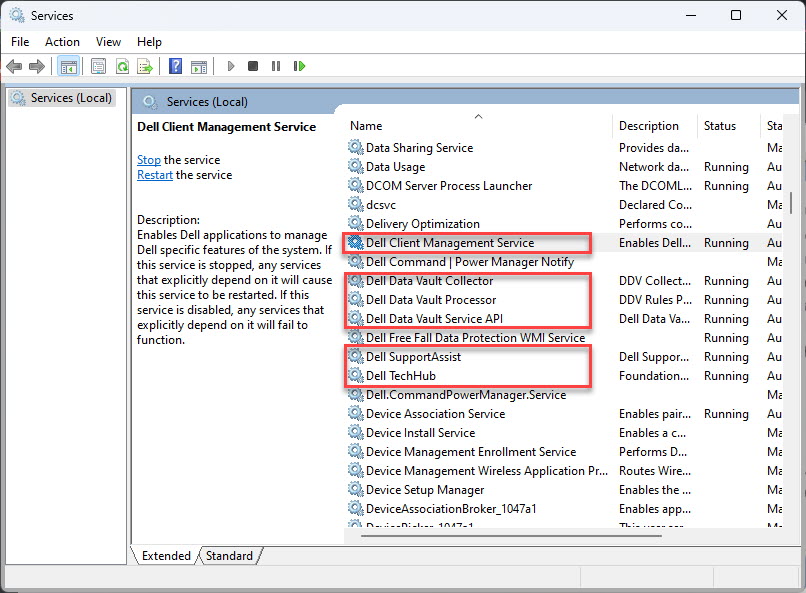
Services console එකේ පෙන්නන Dell services.
Step 3 — Leftover Files Delete කරන්න
1. File Explorer open කරලා hidden items enable කරන්න.
2. Leftover Dell SupportAssist folders delete කරන්න, සාමාන්යයෙන් C:\Program Files\Dell, C:\Program Files (x86)\Dell, සහ C:\ProgramData\Dell යටතේ.
3. Recycle Bin empty කරන්න.
4. ආපහු restart කරන්න.
Warning: SupportAssist-related Dell folders විතරයි delete කරන්න — තවම ඕන අනිත් Dell driver folders තියාගන්න.
Reinstall (Optional)
1. Dell's official support site එකෙන් latest SupportAssist download කරන්න.
2. Installer එක run කරන්න — leftovers remove කරලා තියෙන නිසා, ඒක cleanly install වෙන්න ඕන.
3. Reboot කරලා ඒක correctly open වෙලා update වෙනවද confirm කරන්න.
Troubleshooting
Problem: Service එකක් delete වෙන්නේ නෑ.
Solution: මුලින් stop කරන්න (sc stop "ServiceName"), ඊට පස්සේ sc delete run කරන්න; locked නම් reboot කරන්න.
Problem: Files delete වෙන්නේ නෑ (in use).
Solution: Reboot කරන්න, නැත්නම් Safe Mode එකට boot කරලා, leftover folders delete කරන්න.
Problem: Reinstall තවම fail වෙනවා.
Solution: Services සහ folders ඔක්කොම remove වෙලා PC එක reboot වුණාද බලලා, Dell එකෙන් fresh installer එකක් download කරන්න.
Problem: ඒක ආපහු ඕන නෑ.
Solution: Uninstalled තියන්න පුළුවන්; SupportAssist optional, ඒත් Dell driver updates automate කරනවා.
Conclusion
Clean SupportAssist removal එකක් කියන්නේ app එක uninstall කරලා ඒකේ leftover services සහ folders clear කරන එක. ඒක කරලා, steps අතර reboot කරලා, ඕනෑම reinstall එකක් smoothly යනවා — නැත්නම් සරලවම ඒක off තියන්නත් පුළුවන්.
About TechHub
මේ guide එක TechHub Knowledge Base එකේ කොටසක්. තව step-by-step IT guides සහ support වලට techhub.com.lk එකට යන්න.