Overview
Traditionally, making a bootable USB means wiping the drive and writing a single ISO to it. Ventoy changes that: you install Ventoy onto a USB drive once, then simply copy as many ISO files as the drive can hold. At boot, Ventoy shows a menu of every ISO so you can choose which operating system or tool to launch. This guide shows you how to build and use a Ventoy multiboot drive.
Ventoy lets one USB drive boot many operating systems and tools.
Key Takeaways
- Ventoy is free and open-source, and works with Windows and Linux ISO files.
- You install Ventoy on the USB drive once; afterwards you just copy ISO files onto it.
- Booting from the drive shows a menu of all the ISOs you have copied.
- Ventoy supports UEFI Secure Boot, persistence for Linux, and advanced plugins.
What Is Ventoy and How Does It Work?
Ventoy is an open-source utility for creating multiboot USB drives. Instead of writing one image to the drive, Ventoy installs a small bootloader and creates a large data partition. You copy ISO (and other supported) files directly into that partition. When you boot from the drive, Ventoy scans for those files and presents them in a selectable boot menu — no reformatting is needed each time you add or remove an ISO.
System Requirements
- A USB flash drive large enough for the ISOs you want to carry (8 GB minimum; 32 GB or more recommended).
- A Windows or Linux PC to install Ventoy onto the drive.
- The Ventoy download from the official project site (ventoy.net).
- A PC that can boot from USB in either UEFI or Legacy BIOS mode.
Warning: Installing Ventoy erases everything on the USB drive. Back up any files on the drive before you begin.
How to Create a Multiboot USB Drive Using Ventoy
1. Download Ventoy from the official website (ventoy.net) and extract the downloaded archive.
2. Insert your USB drive and run Ventoy2Disk.exe (on Windows).
3. In the Device drop-down, carefully select your USB drive.
4. Click Install and confirm the warnings — this formats the drive and sets up Ventoy. Wait for the success message.
5. Open File Explorer; the drive now appears as a large data partition.
6. Copy your ISO files (Windows, Ubuntu, recovery tools, etc.) directly onto that partition. You can add several at once.
7. Safely eject the drive — it is now a multiboot USB.
Tip: You can keep adding or deleting ISO files later just by copying them on or off the drive, with no need to reinstall Ventoy.
How to Boot From the Multiboot USB Drive
1. Insert the Ventoy USB drive into the target PC.
2. Power on and open the boot menu (commonly F12, F10, F9, or Esc — check your PC’s manufacturer).
3. Select the USB drive to boot from it.
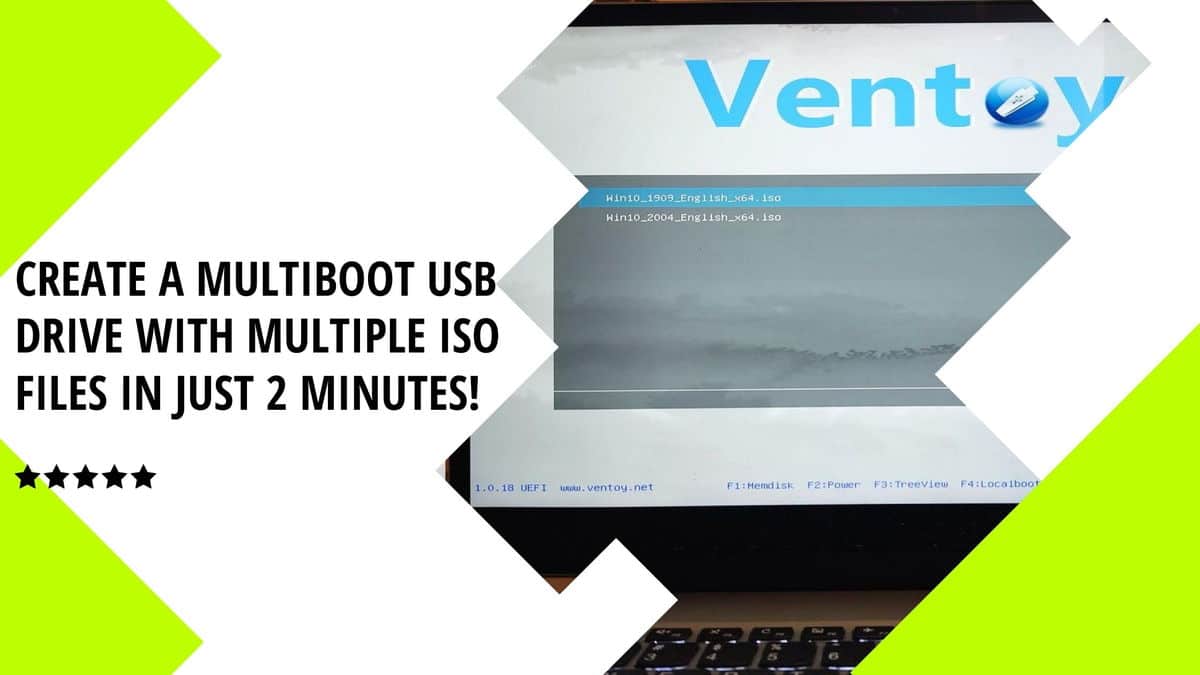
4. Ventoy displays a menu listing every ISO on the drive. Use the arrow keys to choose one and press Enter to boot it.
Ventoy’s boot menu lists every ISO you copied onto the drive.
Enabling UEFI Secure Boot
Ventoy supports UEFI Secure Boot. Enable the Secure Boot option in Ventoy2Disk’s Option menu before installing, then, on first boot, enroll Ventoy’s key when prompted. This lets the drive boot on systems that have Secure Boot turned on.
Advanced Features
- Persistence — keep changes and files between sessions on supported live Linux ISOs.
- Boot menu themes — customise the look of the Ventoy menu.
- Auto-installation scripts — automate unattended Windows or Linux installs.
- VHD and WIM boot — boot virtual disks and Windows imaging files.
- VentoyPlugson — a web-based tool for editing Ventoy configuration easily.
How to Update Ventoy
1. Download the latest Ventoy release from ventoy.net.
2. Run Ventoy2Disk.exe and select your existing Ventoy drive.
3. Click Update (not Install) — this upgrades the bootloader while keeping your ISO files intact.
Note: Use Update rather than Install when upgrading, so your copied ISO files are preserved.
Troubleshooting
Problem: The PC will not boot from the Ventoy drive.
Solution: Open the firmware boot menu and select the USB drive explicitly. If Secure Boot is on, install Ventoy with its Secure Boot option enabled, or temporarily disable Secure Boot in BIOS/UEFI.
Problem: An ISO is missing from the Ventoy menu.
Solution: Make sure the file has a .iso extension and was copied to the Ventoy data partition (not a subfolder Ventoy ignores). Re-copy the file if it was interrupted.
Problem: A specific ISO fails to boot.
Solution: Verify the ISO is not corrupt by checking its checksum, and that it matches your boot mode (UEFI vs Legacy). Some images require the matching firmware mode.
Problem: Windows shows the drive as smaller than expected.
Solution: This is normal — Ventoy creates a small boot partition. Use the large data partition for your ISO files.
Conclusion
Ventoy is the easiest way to keep a whole library of bootable operating systems and rescue tools on one USB drive. Install it once, copy your ISOs, and boot whichever you need from a simple menu — updating later is just a copy-and-paste away.
</w:pBdr><w:spacing w:before="220" w:after="40"/></w:pPr><w:r><w:rPr><w:b/><w:bCs/><w:color w:val="0B5394"/><w:sz w:val="21"/><w:szCs w:val="21"/><w:rFonts w:ascii="Calibri" w:cs="Calibri" w:eastAsia="Calibri" w:hAnsi="Calibri"/></w:rPr><w:t xml:space="preserve">About TechHub
This guide is part of the TechHub Knowledge Base. For more step-by-step IT guides and support, visit techhub.com.lk.