Overview
Telnet is a simple network protocol and command-line tool, handy for testing whether a remote port is open and reachable. Windows includes a Telnet client but it is disabled by default. This guide explains Telnet and how to enable it.
The Telnet client is built into Windows but disabled by default.
Warning: Telnet sends data unencrypted, so it is unsafe for actual remote logins. Use it only for connectivity/port testing; use SSH for secure remote access.
Key Takeaways
- Telnet is great for testing if a host/port is reachable (e.g. telnet host 25).
- The Telnet client is an optional Windows feature you enable.
- Enable it via Optional Features, dism, or PowerShell.
- Telnet is unencrypted — never use it for sensitive logins.
Telnet Client vs Server
- Telnet client — connects out to test ports/services (what most people need).
- Telnet server — accepts incoming Telnet connections (rarely needed, and insecure).
- This guide enables the client.
Method 1 — Optional Features
1. Press Windows key + R, type optionalfeatures, and press Enter.
2. In Windows Features, tick Telnet Client.
3. Click OK and let it install.
4. Open Command Prompt and run telnet to confirm.
Method 2 — Command Prompt (DISM)
1. Open Command Prompt as administrator.
2. Run: dism /online /Enable-Feature /FeatureName:TelnetClient
3. Wait for it to complete, then test with the telnet command.
Method 3 — PowerShell
1. Open PowerShell as administrator.
2. Run: Enable-WindowsOptionalFeature -Online -FeatureName TelnetClient
3. Restart the terminal and run telnet to verify.
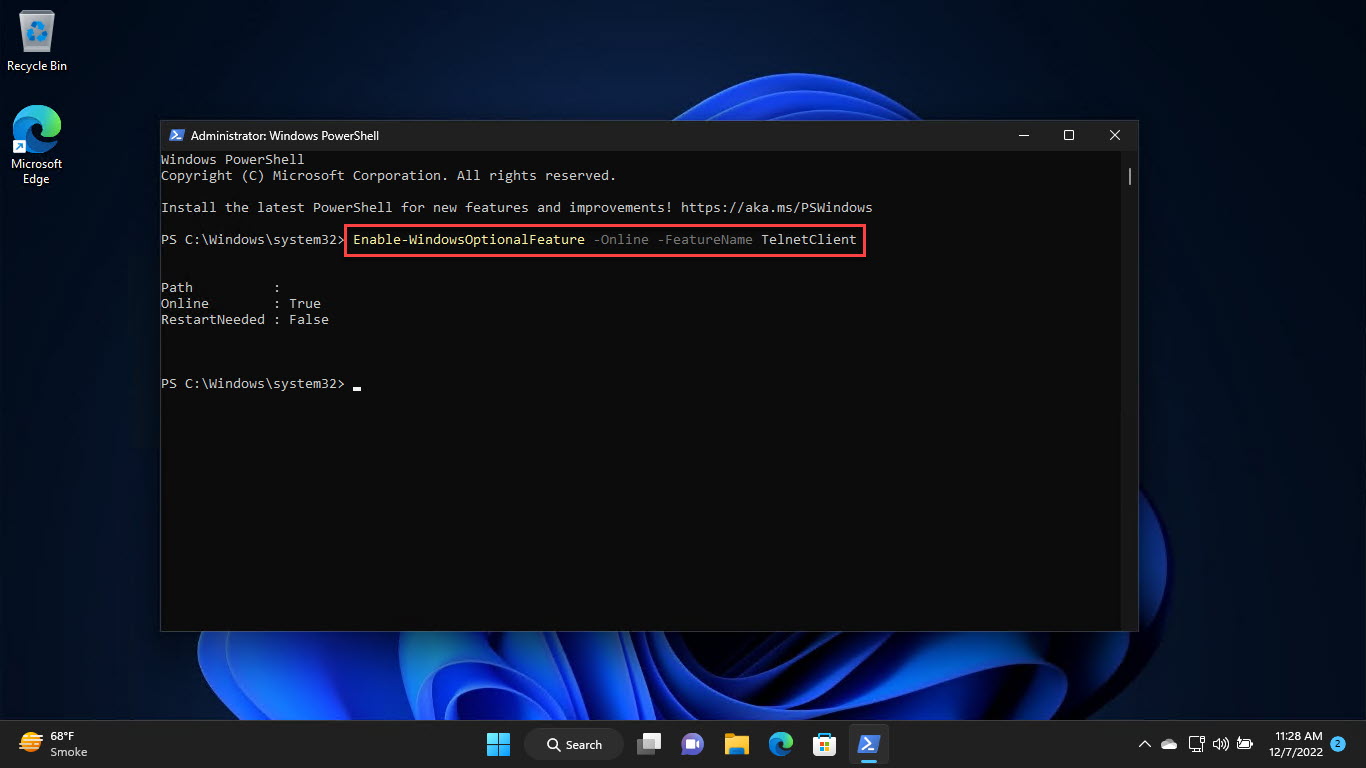
Enabling Telnet with PowerShell.
Test a Port With Telnet
1. Open Command Prompt.
2. Run: telnet HOSTNAME PORT (for example telnet smtp.example.com 25).
3. A blank screen or response means the port is open; an error means it is closed/unreachable.
4. Press Ctrl + ] then type quit to exit.
Troubleshooting
Problem: "telnet is not recognized".
Solution: Enable the Telnet Client feature (Optional Features, DISM, or PowerShell), then open a new terminal.
Problem: Connection fails to a known-open port.
Solution: A firewall, ISP, or the remote host may block it; test from another network and confirm the service is running.
Problem: You need secure remote access.
Solution: Use SSH (OpenSSH) instead of Telnet — Telnet is unencrypted.
Problem: How do I check if Telnet is enabled?
Solution: Run Get-WindowsOptionalFeature -Online -FeatureName TelnetClient in PowerShell and check the State.
Conclusion
Telnet remains a quick way to test network ports. Enable the client via Optional Features or a single command, use telnet host port for diagnostics — and reach for SSH whenever you need secure remote access.
</w:pBdr><w:spacing w:before="220" w:after="40"/></w:pPr><w:r><w:rPr><w:b/><w:bCs/><w:color w:val="0B5394"/><w:sz w:val="21"/><w:szCs w:val="21"/><w:rFonts w:ascii="Calibri" w:cs="Calibri" w:eastAsia="Calibri" w:hAnsi="Calibri"/></w:rPr><w:t xml:space="preserve">About TechHub
This guide is part of the TechHub Knowledge Base. For more step-by-step IT guides and support, visit techhub.com.lk.