Overview
Windows assigns each network a profile — Public, Private, or Domain — that controls how discoverable and shareable your PC is on that network. Setting the right type matters for both security and for features like file sharing. This guide explains the network types and shows four ways to change them.
Switching your network type changes how your PC shares and is discovered.
Key Takeaways
- Public hides your PC and is safest on untrusted networks; Private allows sharing and discovery at home/work.
- Domain is assigned automatically when joined to an organisation’s domain.
- The Settings app is the easiest way to switch between Public and Private.
- PowerShell, Local Security Policy, and the Registry offer alternative methods.
Network Types Explained
- Public — your PC is hidden from other devices; best for cafés, airports, and other untrusted networks.
- Private — your PC is discoverable and can share files/printers; use at home or in a trusted office.
- Domain — applied automatically by Windows when the PC is joined to a corporate domain.
Check Your Current Network Type
1. Open Settings > Network & Internet.
2. Click your active connection (Wi-Fi or Ethernet).
3. The network profile (Public or Private) is shown at the top.
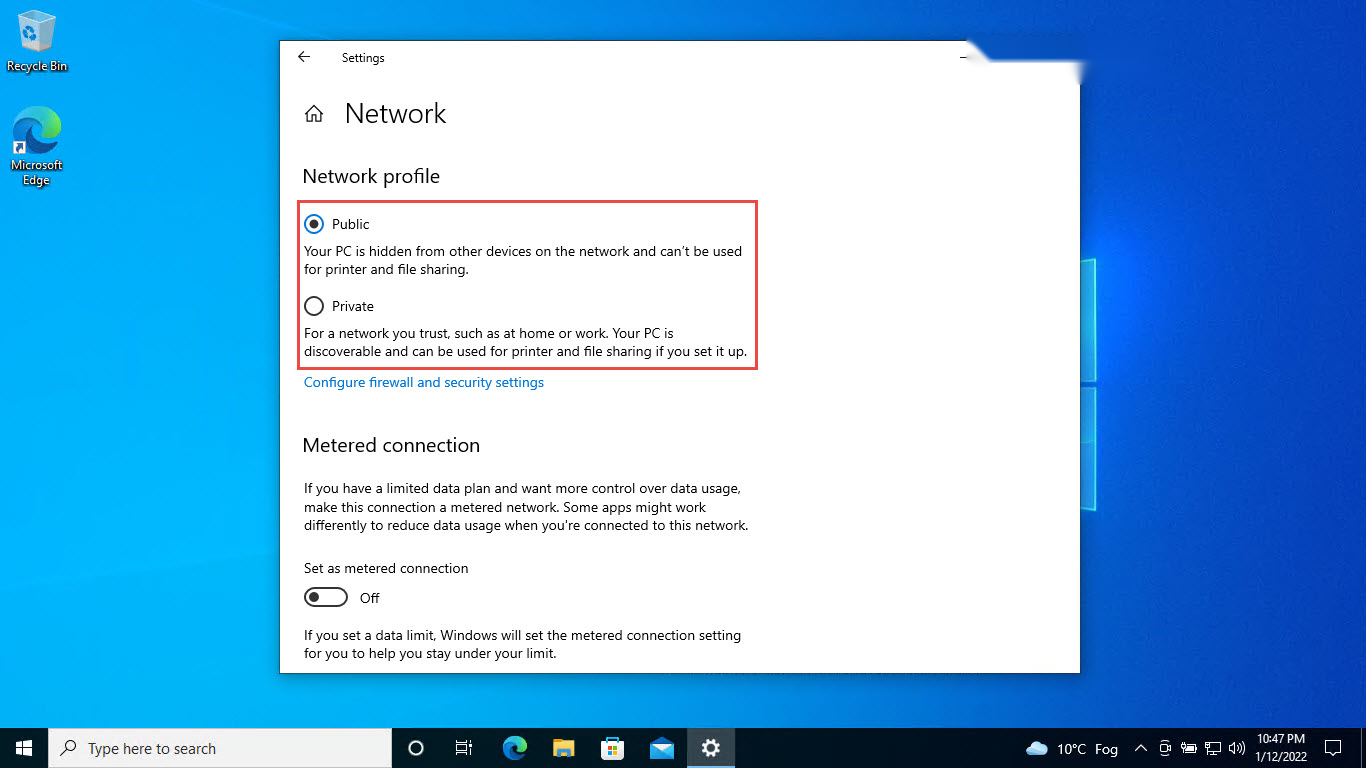
Your current network profile is shown in network settings.
Method 1 — Settings App
1. Open Settings > Network & Internet.
2. Select your active Wi-Fi or Ethernet connection.
3. Under Network profile type, choose Public or Private.
Method 2 — PowerShell
1. Right-click Start and open Windows PowerShell (Admin).
2. Run Get-NetConnectionProfile to see your connection’s name and current category.
3. Run: Set-NetConnectionProfile -InterfaceAlias "Wi-Fi" -NetworkCategory Private (replace the alias and category as needed).
Method 3 — Local Security Policy
1. Press Windows key + R, type secpol.msc, and press Enter (Pro/Enterprise editions).
2. Go to Network List Manager Policies.
3. Double-click your network name, open the Network Location tab, set the Location type, and click OK.
Method 4 — Windows Registry
Warning: Back up the registry before editing (File > Export).
1. Open regedit and go to HKEY_LOCAL_MACHINE\SOFTWARE\Microsoft\Windows NT\CurrentVersion\NetworkList\Profiles.
2. Find your network’s profile subkey (check the ProfileName value).
3. Set the Category value: 0 = Public, 1 = Private, 2 = Domain.
4. Restart or reconnect to apply.
Which Type Should You Use?
- On home or trusted office networks, choose Private to enable sharing and discovery.
- On public or unknown networks, choose Public for the strongest protection.
- Leave Domain to Windows — it applies automatically on managed networks.
Troubleshooting
Problem: The profile option is missing in Settings.
Solution: Make sure you clicked into the specific active connection. Update Windows if the layout differs from these steps.
Problem: File sharing does not work.
Solution: Set the network to Private, then enable Network discovery and File and printer sharing in Advanced sharing settings.
Problem: PowerShell shows the wrong interface.
Solution: Run Get-NetConnectionProfile first to get the exact InterfaceAlias, then use it in the Set command.
Problem: The type reverts after reconnecting.
Solution: Some networks reset the profile. Set it again, and check Local Security Policy if it keeps changing on a managed network.
Conclusion
Choosing the right network type keeps you secure on public networks and enables sharing on trusted ones. The Settings app handles most cases; PowerShell and policy tools help when you need automation or central control.
</w:pBdr><w:spacing w:before="220" w:after="40"/></w:pPr><w:r><w:rPr><w:b/><w:bCs/><w:color w:val="0B5394"/><w:sz w:val="21"/><w:szCs w:val="21"/><w:rFonts w:ascii="Calibri" w:cs="Calibri" w:eastAsia="Calibri" w:hAnsi="Calibri"/></w:rPr><w:t xml:space="preserve">About TechHub
This guide is part of the TechHub Knowledge Base. For more step-by-step IT guides and support, visit techhub.com.lk.