Overview
Credential Guard uses virtualization-based security to isolate and protect Windows credentials from theft (e.g., pass-the-hash). This guide explains it and shows how to enable or disable it — with the safety context for each.
Enabling or disabling Windows Defender Credential Guard.
Warning: Credential Guard is a protective feature. Disable it only when a specific tool/driver requires it (e.g., some VPNs or virtualization software), and re-enable it afterward.
Key Takeaways
- Credential Guard isolates credentials using VBS/Hyper-V.
- It defends against pass-the-hash/pass-the-ticket attacks.
- Enable/disable via Group Policy or the Registry.
- Check its status with System Information or PowerShell.
Check Its Status
1. Run msinfo32 and look at "Virtualization-based security Services Running" for Credential Guard.
2. Or in PowerShell: (Get-CimInstance -ClassName Win32_DeviceGuard -Namespace root\Microsoft\Windows\DeviceGuard).SecurityServicesRunning
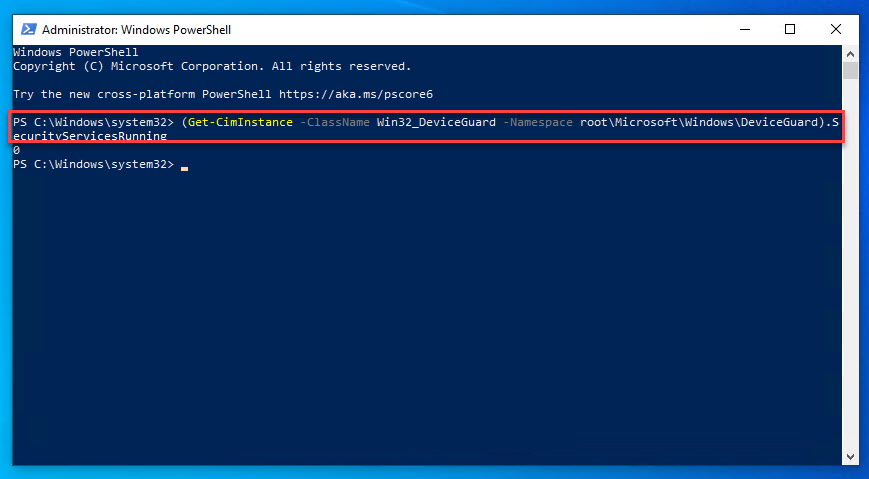
Checking Credential Guard status.
Enable via Group Policy (Pro/Enterprise)
1. Open gpedit.msc.
2. Go to Computer Configuration > Administrative Templates > System > Device Guard.
3. Open "Turn On Virtualization Based Security".
4. Set it Enabled and choose a Credential Guard option (with/without lock), then reboot.
Disable via Group Policy
1. In the same policy, set "Turn On Virtualization Based Security" to Disabled (or set Credential Guard to "Disabled").
2. Reboot.
3. If it persists, clear its UEFI variables using Microsoft’s official Credential Guard readiness tool.
Enable/Disable via the Registry
Warning: Back up the Registry before editing.
1. Go to HKEY_LOCAL_MACHINE\SYSTEM\CurrentControlSet\Control\DeviceGuard.
2. Set EnableVirtualizationBasedSecurity (1 to enable, 0 to disable).
3. Under \Scenarios\HypervisorEnforcedCodeIntegrity or LsaCfgFlags, set the Credential Guard value accordingly.
4. Reboot to apply.
Troubleshooting
Problem: Credential Guard stays on after disabling.
Solution: It stores settings in UEFI — use Microsoft’s official readiness tool to remove the UEFI lock, then reboot.
Problem: A VPN/hypervisor won’t run.
Solution: That software may be incompatible with VBS — temporarily disable Credential Guard, then re-enable it later.
Problem: Can’t enable it.
Solution: Requires a 64-bit CPU with virtualization, Secure Boot, and a supported Windows edition; enable virtualization in UEFI.
Problem: gpedit.msc missing.
Solution: You’re on Windows Home — use the Registry method instead.
Conclusion
Credential Guard meaningfully hardens Windows against credential theft. Enable it via Group Policy or the Registry where supported, and only disable it for specific compatibility needs — remembering to clear its UEFI lock if it refuses to turn off.
</w:pBdr><w:spacing w:before="220" w:after="40"/></w:pPr><w:r><w:rPr><w:b/><w:bCs/><w:color w:val="0B5394"/><w:sz w:val="21"/><w:szCs w:val="21"/><w:rFonts w:ascii="Calibri" w:cs="Calibri" w:eastAsia="Calibri" w:hAnsi="Calibri"/></w:rPr><w:t xml:space="preserve">About TechHub
This guide is part of the TechHub Knowledge Base. For more step-by-step IT guides and support, visit techhub.com.lk.