Overview
Credential Guard එකෙන් Windows credentials හොරකම් වීමෙන් (උදා: pass-the-hash) ආරක්ෂා කරන්න virtualization-based security පාවිච්චි කරලා ඒවා isolate කරනවා. මේ guide එකෙන් ඒක පැහැදිලි කරලා, enable හෝ disable කරන්නේ කොහොමද කියලා — හැම එකකටම safety context එකත් එක්ක පෙන්නනවා.
Windows Defender Credential Guard enable හෝ disable කිරීම.
Warning: Credential Guard කියන්නේ ආරක්ෂක feature එකක්. Disable කරන්නේ නිශ්චිත tool/driver එකකට ඕන වුණොත් විතරයි (උදා: සමහර VPNs හෝ virtualization software), ඊට පස්සේ නැවත enable කරන්න.
Key Takeaways
- Credential Guard එකෙන් VBS/Hyper-V පාවිච්චි කරලා credentials isolate කරනවා.
- pass-the-hash/pass-the-ticket attacks වලින් ආරක්ෂා කරනවා.
- Group Policy හෝ Registry හරහා enable/disable කරන්න.
- ඒකේ status එක System Information හෝ PowerShell වලින් check කරන්න.
Check Its Status
1. msinfo32 run කරලා Credential Guard වෙනුවෙන් "Virtualization-based security Services Running" එක බලන්න.
2. නැත්නම් PowerShell එකේ: (Get-CimInstance -ClassName Win32_DeviceGuard -Namespace root\Microsoft\Windows\DeviceGuard).SecurityServicesRunning
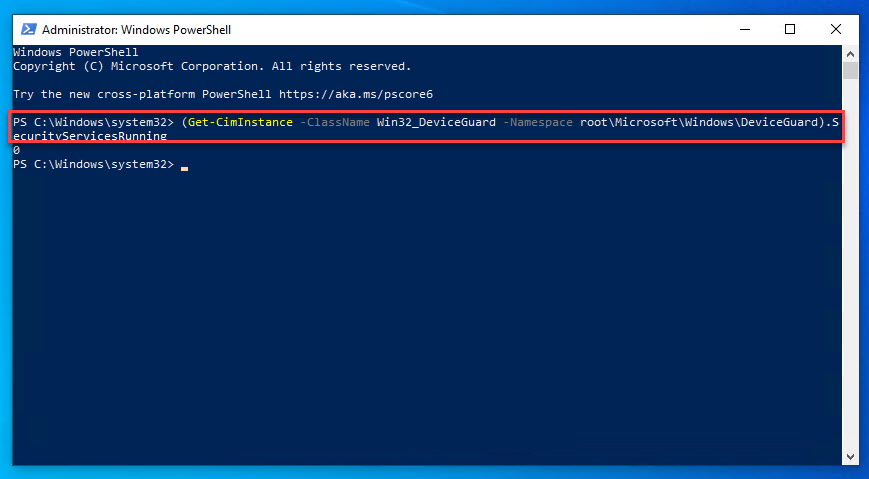
Credential Guard status එක බැලීම.
Enable via Group Policy (Pro/Enterprise)
1. gpedit.msc open කරන්න.
2. Computer Configuration > Administrative Templates > System > Device Guard වෙත යන්න.
3. "Turn On Virtualization Based Security" open කරන්න.
4. ඒක Enabled කරලා Credential Guard option එකක් තෝරලා (with/without lock), ඊට පස්සේ reboot කරන්න.
Disable via Group Policy
1. ඒම policy එකේම, "Turn On Virtualization Based Security" එක Disabled කරන්න (නැත්නම් Credential Guard එක "Disabled" කරන්න).
2. Reboot කරන්න.
3. තාම persist වෙනවා නම්, Microsoft ගේ official Credential Guard readiness tool එකෙන් ඒකේ UEFI variables clear කරන්න.
Enable/Disable via the Registry
Warning: Registry එක edit කරන්න කලින් backup කරන්න.
1. HKEY_LOCAL_MACHINE\SYSTEM\CurrentControlSet\Control\DeviceGuard වෙත යන්න.
2. EnableVirtualizationBasedSecurity set කරන්න (enable කරන්න 1, disable කරන්න 0).
3. \Scenarios\HypervisorEnforcedCodeIntegrity හෝ LsaCfgFlags යටතේ, Credential Guard value එක ඒ අනුව set කරන්න.
4. Apply වෙන්න reboot කරන්න.
Troubleshooting
Problem: Disable කරාට පස්සෙත් Credential Guard එක on ම තියෙනවා.
Solution: ඒක settings UEFI එකේ store කරනවා — UEFI lock එක අයින් කරන්න Microsoft ගේ official readiness tool එක පාවිච්චි කරලා reboot කරන්න.
Problem: VPN/hypervisor එකක් run වෙන්නේ නෑ.
Solution: ඒ software එක VBS එක්ක incompatible වෙන්න පුළුවන් — තාවකාලිකව Credential Guard disable කරලා, පස්සේ නැවත enable කරන්න.
Problem: ඒක enable කරන්න බෑ.
Solution: මේකට virtualization තියෙන 64-bit CPU එකක්, Secure Boot, සහ support කරන Windows edition එකක් ඕන; UEFI එකේ virtualization enable කරන්න.
Problem: gpedit.msc නෑ.
Solution: ඔයා Windows Home එකේ — ඒ වෙනුවට Registry ක්රමය පාවිච්චි කරන්න.
Conclusion
Credential Guard එකෙන් credential හොරකම් වලට එරෙහිව Windows එක සැලකිය යුතු විදිහට harden කරනවා. support කරන තැන්වල Group Policy හෝ Registry හරහා enable කරන්න, disable කරන්නේ නිශ්චිත compatibility අවශ්යතා වලට විතරයි — ඒක off වෙන්නේ නැත්නම් ඒකේ UEFI lock එක clear කරන්න මතක තියාගන්න.
About TechHub
මේ guide එක TechHub Knowledge Base එකේ කොටසක්. තව step-by-step IT guides සහ support වලට techhub.com.lk එකට යන්න.