Overview
On shared or multi-user PCs, several accounts can be signed in at once (active or disconnected). This guide shows four ways to list all signed-in users — handy before restarting a machine or troubleshooting resource usage.
Find all signed-in users in Windows.
Key Takeaways
- query user (quser) lists sessions from Command Prompt.
- PowerShell can enumerate sessions and account details.
- Task Manager’s Users tab shows active sessions visually.
- Useful before reboots to avoid disrupting other users.
Method 1: Command Prompt (query user)
1. Open Command Prompt.
2. Run: query user (or: quser)
3. Review the list of usernames, session IDs, state (Active/Disc), and logon times.
Method 2: Command Prompt (query session)
1. In Command Prompt, run: query session
2. This shows session names and states, including console and RDP sessions.
Method 3: PowerShell
1. Open PowerShell.
2. Run: quser (works in PowerShell too), or parse it for scripting.
3. For logged-on accounts, you can also use: Get-CimInstance Win32_LoggedOnUser
List signed-in accounts using PowerShell.
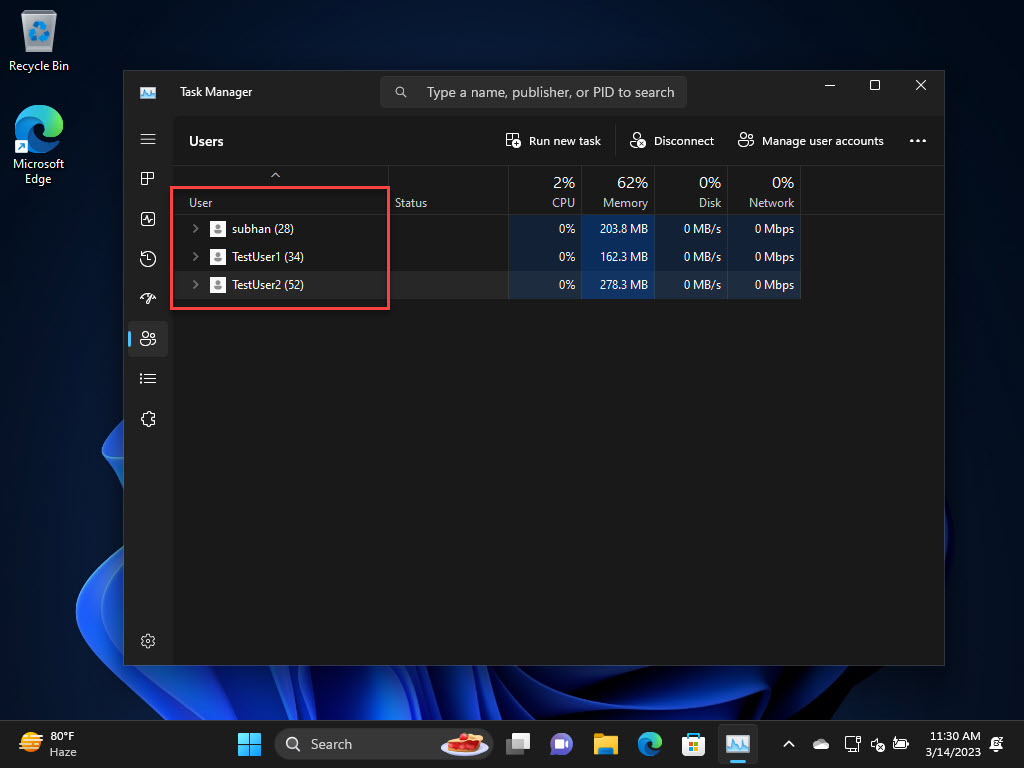
Method 4: Task Manager
1. Open Task Manager (Ctrl + Shift + Esc).
2. Click the Users tab.
3. See each signed-in user, their status, and resource usage; expand to view their apps.
Troubleshooting
Problem: quser isn’t recognised.
Solution: Use the full command "query user"; on Home editions, enable it or use Task Manager’s Users tab instead.
Problem: Access denied.
Solution: Run Command Prompt/PowerShell as administrator to view other users’ sessions.
Problem: A disconnected session lingers.
Solution: Use logoff <SessionID> (from query user) to end it, after confirming no unsaved work.
Problem: Need remote session list.
Solution: Run query user /server:<ComputerName> against a remote machine you administer.
Conclusion
Whether you prefer the command line or a GUI, Windows makes it easy to see who’s signed in. "query user" is the quickest check, while Task Manager’s Users tab gives a clear visual overview before you reboot or troubleshoot.
</w:pBdr><w:spacing w:before="220" w:after="40"/></w:pPr><w:r><w:rPr><w:b/><w:bCs/><w:color w:val="0B5394"/><w:sz w:val="21"/><w:szCs w:val="21"/><w:rFonts w:ascii="Calibri" w:cs="Calibri" w:eastAsia="Calibri" w:hAnsi="Calibri"/></w:rPr><w:t xml:space="preserve">About TechHub
This guide is part of the TechHub Knowledge Base. For more step-by-step IT guides and support, visit techhub.com.lk.